
I’ve worked up quite a backlog of myog projects, which I’m going to try and get done this year. I’ll probably do a write up on most of them with sketches, measurements and costs, but for now a quick presentation of the different projects.
You don’t know this about me, but I love projects. As in I really really like having a project. I like researching the project, I like planning out the project and I like the execution. I think I’ve always loved working out how to do things. This may all stem from some kind of early childhood conditioning. I mean we all know that primary socialization plays a crucial role in shaping ones personality. And so I suspect it may be a result of all of my fathers do-it-yourself home improvement projects. Oh the dangers of being born to parents who thought it would be a good idea to buy a house that hadn’t been renovated since its construction sometime in 1944-45. You really haven’t lived until you’ve scraped 50 years worth of old wallpaper off your stairwell walls using only an atomizer(waterspray thingy?) and a putty knife. Child labour was always very popular at my house. I swear that house was renovated mainly with the help of my siblings, my 80-something year old grandfather and me.
Sure all of these MYOG projects started out as a way of lightening my load and getting exactly the gear that I wanted for not much money. But oh my are they fun to plan out and make. To date I’ve made two tarps, one tent, one double-quilt, a hammock and whoopie slings, two backpacks, a frame bag for my road bike, a stove, a shit load of windscreens and a pot cozy or two… Tarps are cheap, light and so easy to make. The tent was a bit more of a challenge. The quilt was a hassle, not difficult to make as such, it’s just that dealing with down is a bit trying. But oh my are backpacks a shit storm, so many overlays, so many details, undoing stitching, redoing stitching, reinforcing stitching… Backpack no. 1 was no good at all. Backpack no. 2 was better, much better, we took that one up the alps and all around Europe the summer before last. But still it lacked stability and it didn’t carry as well as I would’ve liked.
So naturally I have to give it another go. This time I’ve been a bit more thorough in sketching out the pack before hand. I’ve done more reinforcements and I’ve gone for a more stiff and heavy fabric. This will of course add weight, which bothers me, but so be it.
Further more I’m going to add extra padding to the hip belt and shoulder straps. I’ve got a foam mat lying around which will do nicely. To save weight I am however going to punch as many holes in the foam as I can possibly manage without compromising its structural integrity. The hip belt and back piece will be padded with 3D netting. But I’m not going to use this in the shoulder straps unless I can find some way of searing or laminating the edges so that it doesn’t scratch my neck and collarbone. Because that s**t is enough to drive you halfway crazy on anything more than a long walk, trust me!
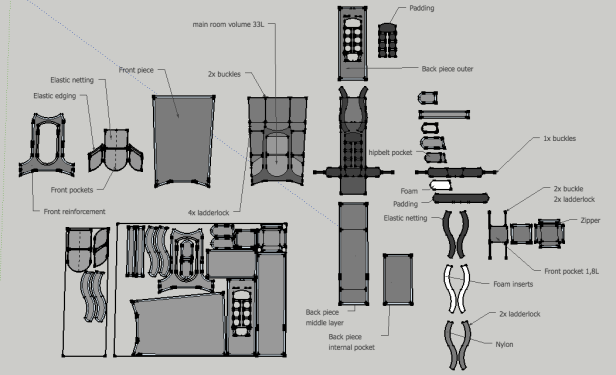
As seen in the sketch-up below the backpack will have one big compartment with an internal volume of about 33L. A small front pocket, that can be removed completely if I should so wish, with a volume of about 1,8L for maps, that days food and my phone. Hip belt pockets hold my knife, extra snacks and my headlamp. On the outside of the backpack, two mesh pockets on the front will most likely hold my rain gear and tent/tarp. Large side pockets slanted for easy access will hold my water bottles and my poles when I’m not using them. A large inside pocket next to my back will hold my sleeping mat, preferably slightly inflated for extra padding.
Not shown on this sketch are details, which are too time consuming for me to want to draw in such as a sternum strap, buckles and the like. Still I’ve written in most of the buckles and straps that I’m going to need.
With 2cm seam allowance added for all pieces of fabric the backpack will fit nicely on a piece of fabric 1,55x2m. I guestimate the cost of the backpack will come to approximately 35-40€/30-35£/37-42$. But I will tally costs when the backpack is actually done.
As if one backpack project wasn’t enough, I’ve actually got another one in progress. This one is a bit less planned out. As the sketch below shows I’ve not got as far along in the disintegration of all the layers of the backpack as I have for the one above. It’s not exactly a loosely formed idea either though I have got quite a clear image of what I want for this backpack.
What I want is a running pack that will bridge the gap between my hiking packs and my trail running pack. I recently got into trail running and signed up for a few races with a friend. Subsequently I had what I would call a slight epiphany and I now want to try my hand at fastpacking. I need it to be light, tight fitting, enough volume for a light load, yet not so much that it wont stay put when I’m running. I’m undecided as to whether I want bottles up front or just snack storage. But I’ve definitely decided on a vest-like design, it works great for the running pack I’ve got already, I swear that thing does not move an inch when you run.


I’ve also got plans and have indeed already started to make a single person side entrance tarp/tent. The design is approximately the same as the two-person tent I made the year before last for the aforementioned hike in the alps and trip across Europe. The design is sound, it’s lightweight and the side entrance will hopefully keep me from pissing myself whilst trying to worm my way out of the front of an a frame tarp in the middle of the night. No traumas about that at all… well maybe just a little.
The tarp is made of 3,5m of 36g/m2 ripstop nylon. Who among us doesn’t love ripstop nylon, it’s cheap, it’s light, it’s lovely. Cost of fabric 11,9€, total cost of tarp approximately 14€/12£/15$. I’m going to have to get back to you with the exact weight and cost, when it’s done.


Last but not least I’ve got plans to beef up my summer sleeping bag with some left over down from a double quilt project. I’d intended to use the down for a down vest or two, but even summer nights in Scandinavia are somewhat chilly and either the temp rating was a bit optimistic or maybe I was, I no longer remember. Either way I’m always too cold in that bag so I’ve decided against the down vests in favour of the sleeping bag. The plan is to turn the bag into a quilt and at the same time beef up the fill a bit.
Check out these MYOG post:
Turning my sleeping bag into a quilt – part 1
Turning my summer sleeping bag into a quilt – part 2
Make your own two person quilt (MYOG)
Make your own solo tarp tent (MYOG)

Already curious to see your new gear 🙂
LikeLike
tent design looks neat
LikeLike